邊緣運算是在資料來源附近進行,以減輕網路壓力及改善延遲。GPU 是邊緣運算的理想運算引擎,因為它們可程式化,且提供驚人的效能。但是管理大量複雜的邊緣裝置,可能會損害 GPU 有利的經濟效益。
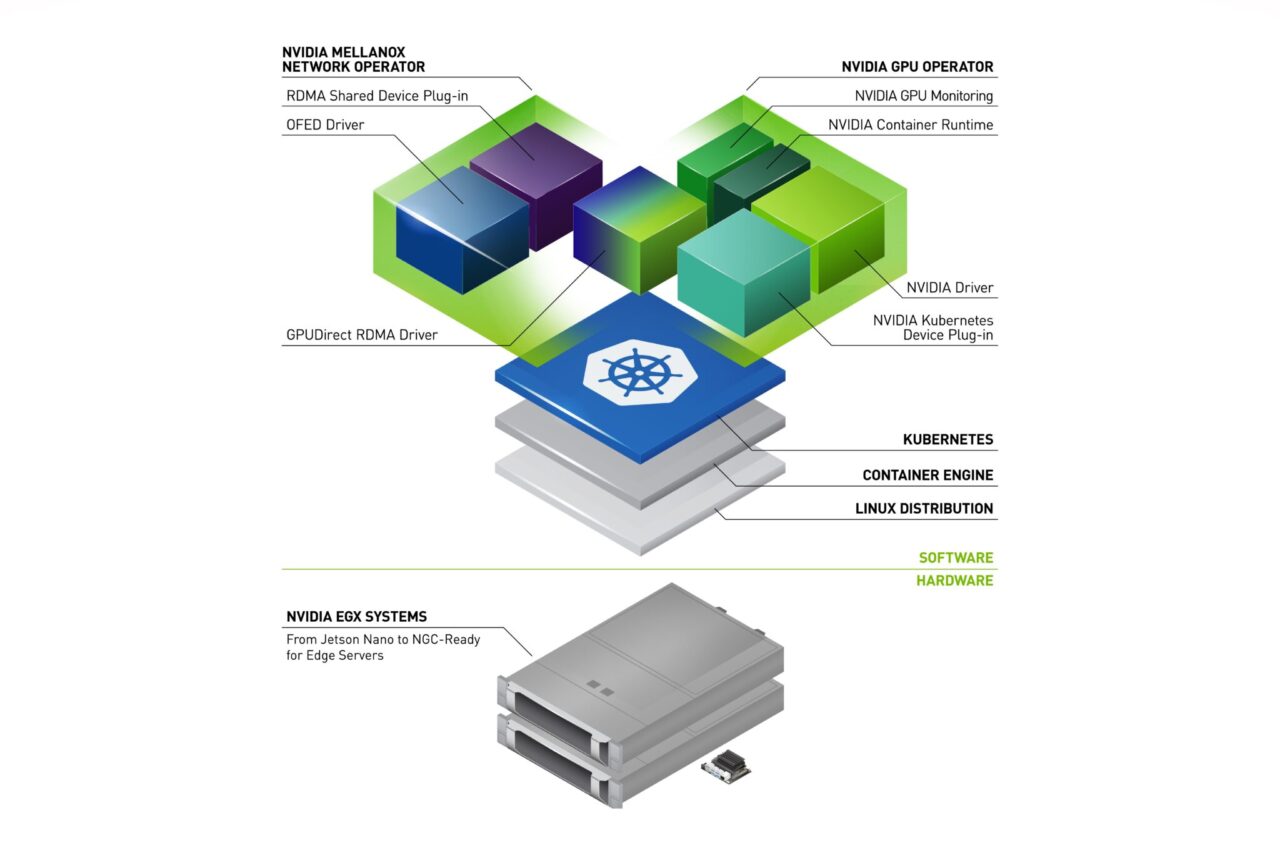
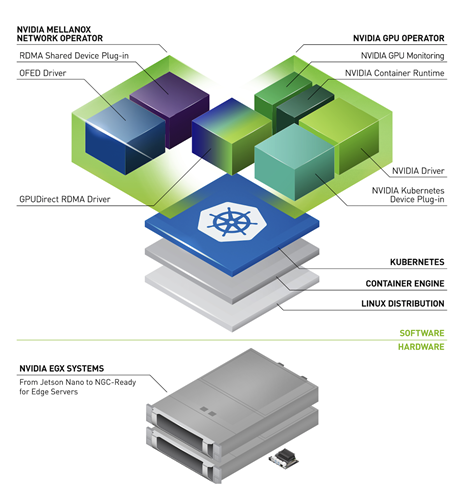
在 2019 年,NVIDIA 推出 GPU Operator,用以簡化 EGX 堆疊上的橫向擴充 GPU 部署與管理。之後,NVIDIA 的客戶已成功將 GPU 應用於各種邊緣 AI 的使用案例,且將 GPU Operator 導入 HPE 和 Dell 發布的參考架構中。
便宜感測器越來越容易取得,使得持續推動邊緣的資料處理需求。單一 GPU 經常同時接收來自數十個感測器的連續資料流,使網路效能成為關鍵的設計考量。
GPUDirect RDMA 是一項可以在 NVIDIA GPU 與支援 RDMA 的網路介面之間,建立快速資料路徑的技術。此技術可以為與網路繫結的 GPU 工作負載,提供線路速率傳輸量和低延遲。GPUDirect RDMA 技術已導入 NVIDIA ConnectX SmartNIC 和 BlueField DPU,在實現邊緣 GPU 的效益中扮演關鍵角色。
本文章將介紹 NVIDIA Network Operator。Network Operator 與 NVIDIA GPU Operator 類似,透過將原本需要手動工作的網路部署和配置層面自動化,以簡化 Kubernetes 的橫向擴充網路設計。它透過 ConnectX 網路介面在任何叢集節點上載入所需的驅動程式、函式庫和裝置外掛程式。在與 GPU Operator 同時安裝時,可啟用 GPUDirect RDMA。本文章說明了 Network Operator 架構,並示範如何在 Kubernetes 中測試 GPUDirect RDMA。
NVIDIA Network Operator 架構
NVIDIA Network Operator 是利用 Kubernetes 自訂資源和 Operator 架構,配置快速網路、RDMA 以及 GPUDirect。Network Operator 之目的是在 Kubernetes 叢集中,安裝啟用 RDMA 和 GPUDirect 需要的主機網路元件。方式是為各個叢集節點中之次要網路上的 IO 密集型工作負載,配置高速資料路徑。
NVIDIA Network Operator 是在 Apache 2.0 授權下,以 GitHub 上的開放原始碼專案形式發布。目前操作器是處於 Alpha 測試狀態。NVIDIA 不支援將網路操作器運用於生產工作負載。
Network Operator 包含下列元件:
- MOFED 驅動程式
- Kubernetes RDMA 共用裝置外掛程式
- NVIDIA 對等記憶體驅動程式
MOFED 驅動程式
Mellanox OpenFabrics 企業發行版(Mellanox OpenFabrics Enterprise Distribution,MOFED)是經過 NVIDIA 網路團隊封裝與測試的網路函式庫和驅動程式集合。MOFED 是透過 Infiniband 與乙太網路互連,支援遠端直接記憶體存取(Remote Direct Memory Access,RDMA)。Network Operator 是使用節點標籤,將預先編譯的 MOFED 驅動程式容器部署在各個 Kubernetes 主機上。容器是在啟動或停止時,載入及卸載 MOFED 驅動程式。
Kubernetes RDMA 共用裝置外掛程式
裝置外掛程式框架將系統硬體資源發布給在 Kubernetes 節點上執行的 Kubelet 代理程式。Network Operator 部署的裝置外掛程式,將 RDMA 資源發布給 Kubelet,並將 RDMA 裝置公開給在節點上執行的 Pod。其允許 Pod 執行 RDMA 操作。所有在節點上執行的 Pod,都可以存取相同的 RDMA 裝置檔案。
NVIDIA 對等記憶體驅動程式
NVIDIA 對等記憶體驅動程式是與網路驅動程式互動,以在 GPU 與主機記憶體之間提供 RDMA 的用戶端。Network Operator 將 NVIDIA 對等記憶體驅動程式,安裝在兼具 ConnectX 網路控制器和 NVIDIA GPU 的節點上。此驅動程式同時會在容器啟動和停止時自動載入與卸載。
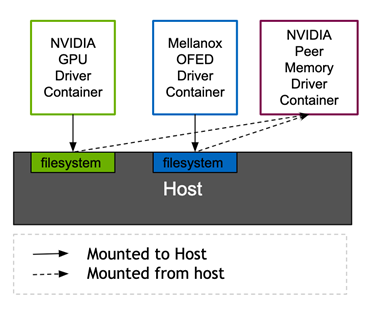
NVIDIA 對等記憶體驅動程式需要來自 MOFED 和 NVIDIA 驅動程式的標頭,才能連結正在執行的核心。GPU 操作器中的 Mellanox 網路驅動程式容器和 NVIDIA 驅動程式容器,都是透過 Kubernetes 磁碟區裝載,將需要的標頭檔案公開給主機檔案系統。目前,NVIDIA 對等記憶體驅動程式是透過 Network Operator 提供。未來,則將由 NVIDIA GPU Operator 提供。此架構允許 ConnectX 網路控制器以標準方式,針對非 NVIDIA 用戶端進行 DMA。
Kubernetes DaemonSets 確保每一個節點都可以執行適當的驅動程式容器。根據各個 Pod 規格中的節點標籤和 Pod 節點選擇器,將容器調度至節點。
| Pod | nodeSelector |
| rdma-device-plugin | pci-15b3.present |
| ofed-driver | pci-15b3.present, kernel-version.full |
| nv-peer-mem-driver | pci-15b3.present, pci-10de.present |
pci-*.present 節點選擇器通知 Kubernetes 調度器,必須在包含具有對應供應商 PCI ID 之 PCI 裝置的節點上調度 Pod。15b3 是 Mellanox 的 PCI 供應商 ID,而 10de 是 NVIDIA 的供應商 ID。MOFED 驅動程式 DaemonSet 和 RDMA 裝置外掛程式 DaemonSet 是調度至具有 Mellanox 裝置的節點。nv-peer-mem-driver DaemonSet 是調度至兼具 Mellanox 和 NVIDIA 裝置的節點。
可以手動新增或透過 node feature discovery 自動設定節點標籤。需要 0.6.0 或更新版本的 node-feature-discovery,才能探索 ConnectX 裝置及啟用 RDMA 功能支援。
部署 Network Operator
本節說明如何部署 Network Operator 和測試 GPUDirect RDMA。首先,驗證主機和 GPU 配置以準備環境。其次,安裝網路操作器,並配置次要網路介面。在套用 Kubernetes 自訂資源,以建立驅動程式容器之後,即可啟動測試 Pod,執行網路效能性能基準測試,驗證 GPUDirect RDMA。
準備環境
檢查 Kubernetes 節點上的作業系統及核心版本。必須使用具備 4.15.0-109-generic 核心的 Ubuntu 18.04。
$ kubectl get nodes -o wide

NAME       STATUS   ROLES    AGE   VERSION   INTERNAL-IP    EXTERNAL-IP   OS-IMAGE             KERNEL-VERSION       CONTAINER-RUNTIME

ubuntu     Ready    master   52d   v1.17.5   10.136.5.105   <none>        Ubuntu 18.04.4 LTS   4.15.0-109-generic   docker://19.3.5

ubuntu00   Ready    <none>   48d   v1.17.5   10.136.5.14    <none>        Ubuntu 18.04.5 LTS   4.15.0-109-generic   docker://19.3.12
確認作業系統核心可以辨識 ConnectX 網路卡和 NVIDIA GPU。在此範例輸出中,系統具有四個 NVIDIA GPU 和雙連接埠「Mellanox Technologies」HCA。
$ lspci | egrep 'Mell|NV'

12:00.0 3D controller: NVIDIA Corporation Device 1eb8 (rev a1)

37:00.0 Ethernet controller: Mellanox Technologies MT27800 Family [ConnectX-5]

37:00.1 Ethernet controller: Mellanox Technologies MT27800 Family [ConnectX-5]

86:00.0 3D controller: NVIDIA Corporation Device 1eb8 (rev a1)

af:00.0 3D controller: NVIDIA Corporation Device 1eb8 (rev a1)

d8:00.0 3D controller: NVIDIA Corporation Device 1eb8 (rev a1)
確認節點已標示 Mellanox 和 NVIDIA 的 PCI 供應商 ID:
$ kubectl describe nodes  | egrep 'hostname|10de|15b3'

feature.node.kubernetes.io/pci-10de.present=true

feature.node.kubernetes.io/pci-15b3.present=true

kubernetes.io/hostname=ubuntu

feature.node.kubernetes.io/pci-10de.present=true

feature.node.kubernetes.io/pci-15b3.present=true

kubernetes.io/hostname=ubuntu00
如果未使用 Node Feature Discovery 操作器,請手動為節點標示需要的 PCI 供應商 ID:
$ kubectl label nodes ubuntu feature.node.kubernetes.io/pci-15b3.present=true

node/ubuntu labeled


$ kubectl label nodes ubuntu00 feature.node.kubernetes.io/pci-15b3.present=true

node/ubuntu00 labeled
確認 GPU 操作器已安裝及正在執行:
$ helm ls -a

NAME                      NAMESPACE         REVISION     UPDATED                                      STATUS       CHART               APP VERSION

gpu-operator-1595438607   gpu-operator 1             2020-07-22 10:23:30.445666838 -0700 PDT   deployed     gpu-operator-1.1.7      1.1.7


$ kubectl get ds -n gpu-operator-resources

NAME                                 DESIRED   CURRENT   READY   UP-TO-DATE   AVAILABLE   NODE SELECTOR                                      AGE

nvidia-container-toolkit-daemonset   2         2         2       2            2           feature.node.kubernetes.io/pci-10de.present=true   32d

nvidia-dcgm-exporter                 2         2         2       2            2           feature.node.kubernetes.io/pci-10de.present=true   32d

nvidia-device-plugin-daemonset       2         2         2       2            2           feature.node.kubernetes.io/pci-10de.present=true   32d

nvidia-driver-daemonset              2         2         2       2            2           feature.node.kubernetes.io/pci-10de.present=true   32d
安裝網路操作器
複製標記為 v0.1.0 的 network-operator git 分支:
$ git clone --branch v0.1.0 --single-branch git@github.com:Mellanox/network-operator.git

Cloning into 'network-operator'...

remote: Enumerating objects: 1, done.

remote: Counting objects: 100% (1/1), done.

remote: Total 729 (delta 0), reused 0 (delta 0), pack-reused 728

Receiving objects: 100% (729/729), 195.29 KiB | 1.70 MiB/s, done.

Resolving deltas: 100% (405/405), done.

Note: checking out '09088d76ef29e5208673e3d1ec90c787754c1bee'.
使用 deploy-operator.sh 指令碼部署網路操作器。
$ cd ~/network-operator/example


~/network-operator/example$ sudo ./deploy-operator.sh

Deploying Network Operator:

###########################

namespace/mlnx-network-operator created

customresourcedefinition.apiextensions.k8s.io/nicclusterpolicies.mellanox.com created

role.rbac.authorization.k8s.io/network-operator created

clusterrole.rbac.authorization.k8s.io/network-operator created

serviceaccount/network-operator created

rolebinding.rbac.authorization.k8s.io/network-operator created

clusterrolebinding.rbac.authorization.k8s.io/network-operator created

deployment.apps/network-operator created
檢視安裝程式指令碼建立的資源。
$ kubectl get all -n mlnx-network-operator

NAME                                    READY   STATUS    RESTARTS   AGE

pod/network-operator-7b6846c69f-skms6   1/1     Running   0          14m


NAME                               READY   UP-TO-DATE   AVAILABLE   AGE

deployment.apps/network-operator   1/1     1            1           14m


NAME                                          DESIRED   CURRENT   READY   AGE

replicaset.apps/network-operator-7b6846c69f   1         1         1       14m
配置次要網路
如前所述,網路操作器部署及配置了 MOFED 驅動程式和 RDMA 共用裝置外掛程式。它同時會將 GPUDirect RDMA 驅動程式,安裝在具有 NVIDIA GPU 的節點上。在 Kubernetes 叢集上執行RDMA 工作負載,需要以下的其他配置:
- 配置持續及可預測的網路裝置名稱。
- 將網路裝置初始化。
- 在 RDMA 網路裝置上部署次要 Kubernetes macvlan 網路。
- 為次要網路配置 IP 位址管理(IPAM)。
- 定義工作負載以應用 RDMA 裝置及其對應的次要網路和 GPU(若有需要)。
此環境專用配置不包含在自動化中。
編輯 RDMA 網路自訂資源定義,以配置 IP 位址範圍和 MACVLAN 網路裝置名稱。於此範例中,次要網路介面為裝置 ens2f0。
~/network-operator/example$ egrep 'range|master|mtu' networking/rdma-net-cr-whereabouts-ipam.yml

# Configuration below assumes 'ens2f0' as master device for macvlan CNI,

"range": "192.168.111.0/24",

"master": "ens2f0",

"mtu": 9000
執行 deploy-rdma-net-ipam.sh 指令碼。此指令碼配置次要網路及管理 IP 位址指派。
~/network-operator/example$ sudo ./deploy-rdma-net-ipam.sh

Deploying Secondary Network with Whereabouts IPAM: "rdma-net-ipam" with RDMA resource : "rdma/hca_shared_devices_a"

#######################################################################################################################

customresourcedefinition.apiextensions.k8s.io/network-attachment-definitions.k8s.cni.cncf.io created

clusterrole.rbac.authorization.k8s.io/multus created

clusterrolebinding.rbac.authorization.k8s.io/multus created

serviceaccount/multus created

configmap/multus-cni-config created

daemonset.apps/kube-multus-ds-amd64 created

daemonset.apps/kube-multus-ds-ppc64le created

customresourcedefinition.apiextensions.k8s.io/ippools.whereabouts.cni.cncf.io created

serviceaccount/whereabouts created

clusterrolebinding.rbac.authorization.k8s.io/whereabouts created

clusterrole.rbac.authorization.k8s.io/whereabouts-cni created

daemonset.apps/whereabouts created

networkattachmentdefinition.k8s.cni.cncf.io/rdma-net-ipam created
在自訂資源中設定 devicePlugin.config 欄位,以符合 RDMA 網路裝置名稱。於此範例中,其名稱為 ens2f0。
~/network-operator/example$ grep devices \

deploy/crds/mellanox.com_v1alpha1_nicclusterpolicy_cr.yaml

# Replace 'devices' with your (RDMA-capable) netdevice name.

"resourceName": "hca_shared_devices_a",

"devices": ["ens2f0"]
套用 NIC 叢集原則自訂資源定義,以指定驅動程式容器版本。
~/network-operator/example$ kubectl create -f deploy/crds/mellanox.com_v1alpha1_nicclusterpolicy_cr.yaml

nicclusterpolicy.mellanox.com/example-nicclusterpolicy created
確認已成功部署驅動程式容器。
$ kubectl get pods -n mlnx-network-operator

NAME                                                            READY   STATUS    RESTARTS   AGE

network-operator-7b6846c69f-tccv8                               1/1     Running   2          51m

nv-peer-mem-driver-amd64-ubuntu18.04-ds-2qrjh                   1/1     Running   16         33m

nv-peer-mem-driver-amd64-ubuntu18.04-ds-5k5wb                   1/1     Running   0          33m

ofed-driver-amd64-ubuntu18.04-kver4.15.0-109-generic-ds-2knvc   1/1     Running   0          75s

ofed-driver-amd64-ubuntu18.04-kver4.15.0-109-generic-ds-c9xz9   1/1     Running   0          33m

rdma-shared-dp-ds-4cgr2                                         1/1     Running   0          33m

rdma-shared-dp-ds-lqmk7                                         1/1     Running   2          33m
OFED 驅動程式容器經過預先編譯,可以支援特定的 MOFED 版本、作業系統及核心版本組合。
| 元件 | 版本 |
| OFED 版本 | 5.0-2.1.8.0 |
| 作業系統 | ubuntu-18.04 |
| 核心 | 4.15.0-109-generic |
確認已將 NVIDIA 對等記憶體驅動程式安裝在節點上。
$ lsmod | grep nv_peer_mem

nv_peer_mem            16384  0

ib_core               323584  11 rdma_cm,ib_ipoib,mlx4_ib,nv_peer_mem,iw_cm,ib_umad,rdma_ucm,ib_uverbs,mlx5_ib,ib_cm,ib_ucm

nvidia              20385792  117 nvidia_uvm,nv_peer_mem,nvidia_modeset
NIC 叢集原則自訂資源是網路操作器的配置介面。以下程式碼範例是顯示為自訂資源規格的內容。
apiVersion: mellanox.com/v1alpha1

kind: NicClusterPolicy

metadata:

name: example-nicclusterpolicy

namespace: mlnx-network-operator

spec:

ofedDriver:

image: ofed-driver

repository: mellanox

version: 5.0-2.1.8.0

devicePlugin:

image: k8s-rdma-shared-dev-plugin

repository: mellanox

version: v1.0.0

config: |

{

"configList": [

{

"resourceName": "hca_shared_devices_a",

"rdmaHcaMax": 1000,

"devices": ["ens2f0"]

}

]

}

nvPeerDriver:

image: nv-peer-mem-driver

repository: mellanox

version: 1.0-9

gpuDriverSourcePath: /run/nvidia/driver
此檔案定義 OFED 驅動程式、RDMA 共用裝置外掛程式,以及 NVIDIA 對等記憶體用戶端驅動程式版本。其同時定義了 RDMA 根裝置名稱,並指定安裝時將要建立之共用 RDMA 裝置的數量。
驗證安裝
建立 Pod,以在次要網路上測試共用 RDMA。
~/network-operator/example$ kubectl create -f rdma-test-pod1.yml

pod/rdma-test-pod-1 created


~/network-operator/example$ kubectl create -f rdma-test-pod2.yml

pod/rdma-test-pod-2 created


~/network-operator/example$ kubectl get pods

NAME              READY   STATUS    RESTARTS   AGE

rdma-test-pod-1   1/1     Running   0          7s

rdma-test-pod-2   1/1     Running   0          5s
在 Pod 中找出使用中之網路裝置的名稱。
~/network-operator/example$ kubectl exec -it -n mlnx-network-operator ofed-driver-amd64-ubuntu18.04-kver4.15.0-109-generic-ds-2knvc ibdev2netdev

mlx5_0 port 1 ==> ens2f0 (Up)

mlx5_1 port 1 ==> ens2f1 (Down)

mlx5_2 port 1 ==> eno5 (Down)

mlx5_3 port 1 ==> eno6 (Down)
在 Pod 1 上執行 perftest 伺服器。
~/network-operator/example$ kubectl exec -it rdma-test-pod-1 -- bash

[root@rdma-test-pod-1 /]# ib_write_bw -d mlx5_0 -a -F --report_gbits -q 1

************************************

* Waiting for client to connect... *

************************************
在其他的終端機中,列印 Pod 1 上的次要介面網路位址。
~/network-operator/example$ kubectl exec rdma-test-pod-1 -- ip addr show dev net1

5: net1@if24: <BROADCAST,MULTICAST,UP,LOWER_UP> mtu 9000 qdisc noqueue state UP group default

link/ether 62:51:fb:13:88:ce brd ff:ff:ff:ff:ff:ff link-netnsid 0

inet 192.168.111.1/24 brd 192.168.111.255 scope global net1

valid_lft forever preferred_lft forever
在 Pod 2 上啟動互動式終端機,並列印 Pod 1 上的介面。
~$ kubectl exec -it rdma-test-pod-2 -- bash

[root@rdma-test-pod-2 /]# ping -c 3 192.168.111.1

PING 192.168.111.1 (192.168.111.1) 56(84) bytes of data.

64 bytes from 192.168.111.1: icmp_seq=1 ttl=64 time=0.293 ms

64 bytes from 192.168.111.1: icmp_seq=2 ttl=64 time=0.120 ms

64 bytes from 192.168.111.1: icmp_seq=3 ttl=64 time=0.125 ms

--- 192.168.111.1 ping statistics ---

3 packets transmitted, 3 received, 0% packet loss, time 2037ms

rtt min/avg/max/mdev = 0.120/0.179/0.293/0.081 ms

Run the perftest write benchmark. This test measures maximum RDMA network throughput between the Pods.

[root@rdma-test-pod-2 /]# ib_write_bw -d mlx5_0 -a -F --report_gbits -q 1 192.168.111.1

---------------------------------------------------------------------------------------

RDMA_Write BW Test

Dual-port       : OFF          Device         : mlx5_0

Number of qps   : 1            Transport type : IB

Connection type : RC           Using SRQ      : OFF

TX depth        : 128

CQ Moderation   : 100

Mtu             : 4096[B]

Link type       : Ethernet

GID index       : 2

Max inline data : 0[B]

rdma_cm QPs : ON

Data ex. method : rdma_cm

---------------------------------------------------------------------------------------

local address: LID 0000 QPN 0x01fd PSN 0x4ebaee

GID: 00:00:00:00:00:00:00:00:00:00:255:255:192:168:111:02

remote address: LID 0000 QPN 0x01f8 PSN 0xbe97c2

GID: 00:00:00:00:00:00:00:00:00:00:255:255:192:168:111:01

---------------------------------------------------------------------------------------

#bytes     #iterations    BW peak[Gb/sec]    BW average[Gb/sec]   MsgRate[Mpps]

2          5000           0.083670            0.082376            5.148474

4          5000             0.17               0.17                  5.229830

8          5000             0.34               0.33                  5.229340

16         5000             0.68               0.67                  5.213672

32         5000             1.35               1.34                  5.248994

64         5000             2.70               2.68                  5.228968

128        5000             5.41               5.40                  5.275896

256        5000             10.80              10.73                 5.239736

512        5000             21.42              21.30                 5.200598

1024       5000             42.67              42.66                 5.207166

2048       5000             76.99              76.27                 4.655341

4096       5000             96.15              90.05                 2.748027

8192       5000             97.64              97.29                 1.484576

16384      5000             97.84              97.74                 0.745729

32768      5000             97.82              97.76                 0.372912

65536      5000             97.96              97.95                 0.186826

131072     5000             97.94              97.57                 0.093055

262144     5000             97.95              97.54                 0.046513

524288     5000             97.95              97.65                 0.023282

1048576    5000             98.02              98.01                 0.011684

2097152    5000             98.03              98.03                 0.005843

4194304    5000             97.38              97.27                 0.002899

8388608    5000             98.02              97.64                 0.001455

-------------------------------------------------------------------------------------
基準測試達到大約 98 Gbps 的傳輸量,已接近此 100 Gb 控制器的最大線路速率。
刪除 rdma 測試 Pod。
$ kubectl delete pod rdma-test-pod-1

pod "rdma-test-pod-1" deleted

$ kubectl delete pod rdma-test-pod-2

pod "rdma-test-pod-2" deleted
使用 rdma-gpu-test podspecs 重複相同的測試。這些 Pod 測試了一個系統中的網路卡與另一個系統中之 GPU 之間的 GPUdirect RDMA 效能。
~/network-operator/example$ kubectl create -f rdma-gpu-test-pod1.yml

pod/rdma-gpu-test-pod-1 created


~/network-operator/example$ kubectl create -f rdma-gpu-test-pod2.yml

pod/rdma-gpu-test-pod-2 created
在其中一個 Pod 上啟動互動式終端機。
$ kubectl exec -it rdma-gpu-test-pod-1 -- bash
使用 –use_cuda 選項,啟動效能基準測試。
rdma-gpu-test-pod-1:~# ib_write_bw -d mlx5_0 -a -F --report_gbits -q 1 --use_cuda=0

-------------------------------------------------------------------------------------

************************************

* Waiting for client to connect... *

************************************
連線至第二個 Pod,並啟動效能測試。
$ kubectl exec -it rdma-gpu-test-pod-2 -- bash

rdma-gpu-test-pod-2:~# ib_write_bw -d mlx5_0 -a -F --report_gbits -q 1 192.168.111.1

RDMA_Write BW Test

Dual-port       : OFF          Device         : mlx5_0

Number of qps   : 1            Transport type : IB

Connection type : RC           Using SRQ      : OFF

PCIe relax order: Unsupported

ibv_wr* API     : OFF

TX depth        : 128

CQ Moderation   : 100

Mtu             : 4096[B]

Link type       : Ethernet

GID index       : 2

Max inline data : 0[B]

rdma_cm QPs : OFF

Data ex. method : Ethernet

-------------------------------------------------------------------------------------

local address: LID 0000 QPN 0x020e PSN 0x29b8e1 RKey 0x014e8d VAddr 0x007f4a2f74b000

GID: 00:00:00:00:00:00:00:00:00:00:255:255:192:168:111:02

remote address: LID 0000 QPN 0x020d PSN 0x24bc9e RKey 0x012864 VAddr 0x007fca15800000

GID: 00:00:00:00:00:00:00:00:00:00:255:255:192:168:111:01

-------------------------------------------------------------------------------------

#bytes     #iterations    BW peak[Gb/sec]    BW average[Gb/sec]   MsgRate[Mpps]

2          5000           0.076617            0.074692            4.668252

4          5000             0.16               0.15                  4.781188

8          5000             0.31               0.31                  4.838186

16         5000             0.62               0.62                  4.812724

32         5000             1.25               1.23                  4.817500

64         5000             2.49               2.42                  4.724497

128        5000             4.99               4.93                  4.816670

256        5000             9.99               9.85                  4.811366

512        5000             19.97              19.56                 4.776414

1024       5000             39.64              34.57                 4.219684

2048       5000             75.75              73.78                 4.503022

4096       5000             81.89              81.70                 2.493145

8192       5000             80.60              80.58                 1.229511

16384      5000             82.08              82.08                 0.626200

32768      5000             82.11              82.11                 0.313206

65536      5000             82.12              81.95                 0.156307

131072     5000             82.13              82.12                 0.078317

262144     5000             82.10              82.10                 0.039147

524288     5000             82.12              82.10                 0.019575

1048576    5000             82.12              82.11                 0.009789

2097152    5000             82.11              82.06                 0.004891

4194304    5000             82.12              82.06                 0.002446

8388608    5000             82.12              82.07                 0.001223

-------------------------------------------------------------------------------------
RDMA 範例 Pod 不會在 GPU、網路控制器與 Pod CPU 插槽之間強制執行 NUMA 對齊。每一次執行的效能可能不同,視提供給 Pod 的資源而定。
刪除 RDMA GPU 測試 Pod。
$ kubectl delete pod rdma-gpu-test-pod-1

pod "rdma-gpu-test-pod-1" deleted


$ kubectl delete pod rdma-gpu-test-pod-2

pod "rdma-gpu-test-pod-2" deleted
結論和後續步驟
NVIDIA GPU Operator 可將 Kubernetes 上的 GPU 部署和管理自動化。本文章介紹了 NVIDIA Network Operator:將 Kubernetes 上的網路堆疊部署和配置自動化的軟體。在同時部署時,將會啟用 GPUDirect RDMA,為 NVIDIA GPU 與支援 RDMA 之網路介面之間的快速資料路徑。這是資料密集型邊緣工作負載的關鍵賦能技術。
Network Operator 仍在開發的早期階段,還未獲得 NVIDIA 支援。請複製 network-operator GitHub 儲存庫,並貢獻程式碼或提出問題。未來工作的方向,包括改善裝置之間的 NUMA 對齊、擴展裝置外掛程式以納入 SR-IOV、支援更多作業系統,以及在多對 NIC/GPU 之間配置 GPUDirect RDMA。